Keep warm indoor, sleep all night – the automated system will collect light all night long.
Automating your astro-imaging is getting easier and easier all the time. New hardware and software solutions becomes available for the dedicated amateur astronomer. In this post I will tell how I have used the software NINA – Nighttime Imaging ‘N’ Astronomy to automate my imaging setup.
With the automated setup I am now able to start up all the equipment in 5 minutes. Then I select and start a premade session for the night. That’s it. Back inside waiting for the subs to show up.
Here is what the session script does:
- Slew telescope to target
- Recenter and rotates FOV to requested position based on plate solve.
- Perform autofocus
- Calibrates and starts the autoguider
- Select filter
- Takes the requested subs.
- Slews to the next target – this also rewinds the Telescope rOTAtor.
I hope you will enjoy reading this and that it can help you setting up your own system.
First a quick appetizer on how simple it works
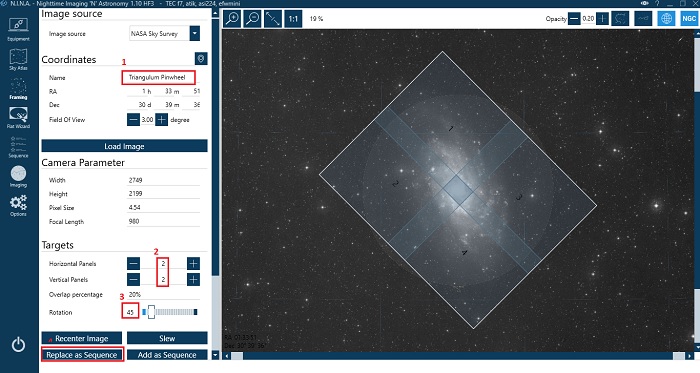
In the framing assistant in NINA I select target M33 – The Triangulum Galaxy. To get all of the Galaxy in the Field of view I pick a 2×2 panel mosaic and rotates the FOV as wished.
This targeting is automatically transferred into a Sequence with 4 targets – one for each panel.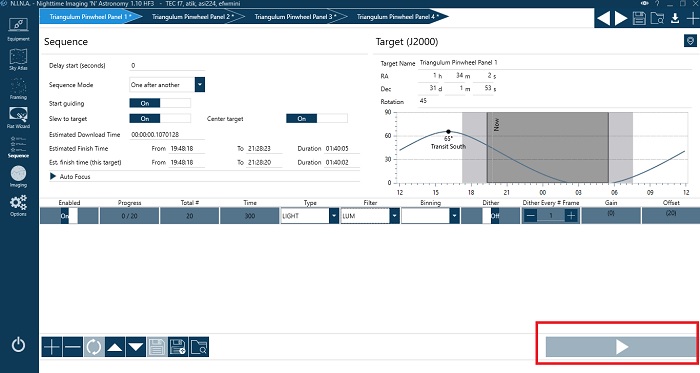
I then input the number of subs for each panel. I keep the total exposure time per panel below 1 hours to stay within the Telescope rOTAtor’s tracking time.
That’s it. Just hit play and the subs are taken. To get longer total exposure time just run the sequence several time – the same night or over several nights.
Here is the resulting stacked frames showed in PixInsigt (not yet assembled to one image)
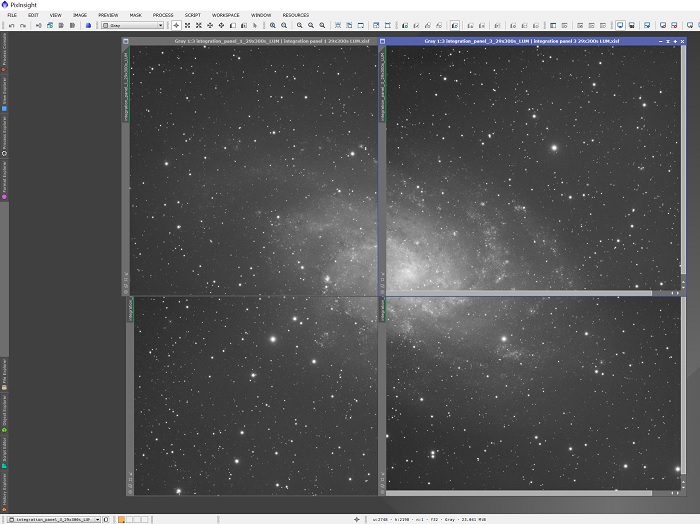
Getting all these frames on the harddisk was so easy. Processing it all into one color image that something else that I haven’t completed yet….
To enjoy this kind of automation you need to use some time to setup the system. Here is how it is done.
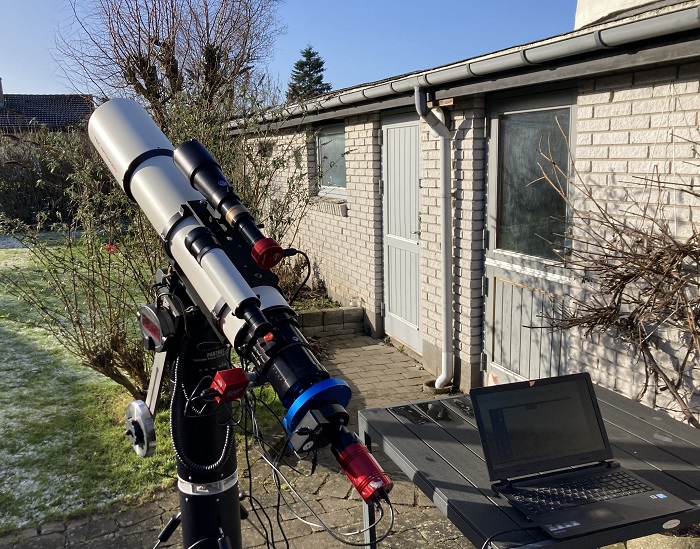
Equipment used for the setup

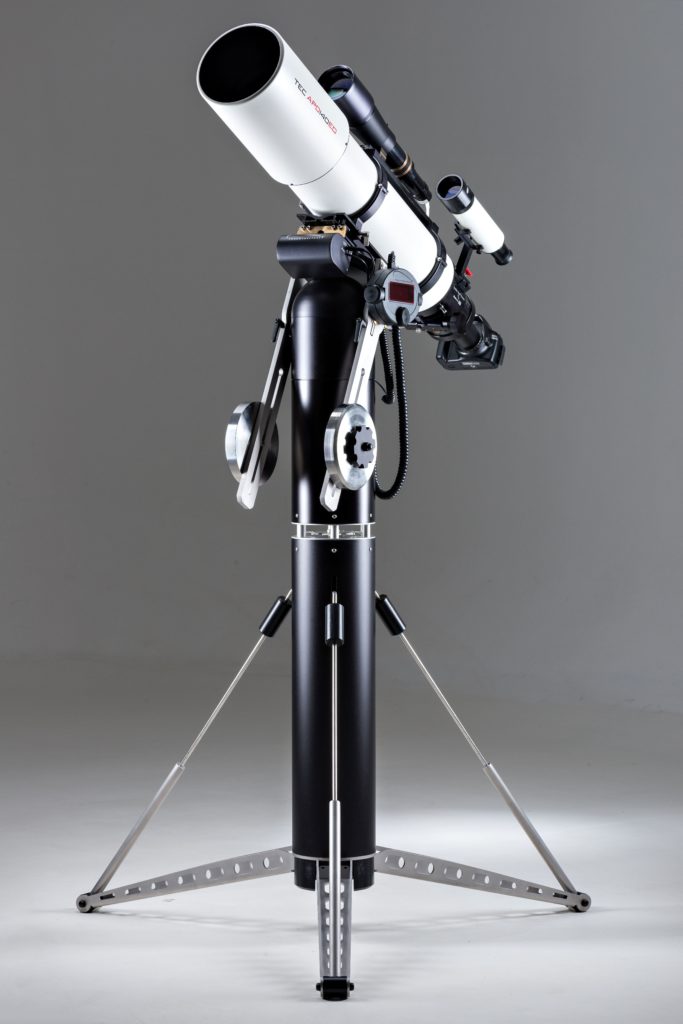
- Mount: TTS-160 Panther with telescope rOTAtor
- Telescope: TEC-140 APO
- Camera: Atik 460ex mono
- Camera rotator: Pegasus Astro, Falcon
- Filter wheel: ZWO EFW
- Focus motor: ZWO EAF
- Guide telescope: TV60
- Guide camera: ZWO ASI224MC
- Startech 7 port USB-3 hub
- Laptop
And a lot of cables, dew heaters etc. but I will leave that out (feel free to ask for any details).
I connected all USB cables from the different devises to the USB hub, that was installed on the counterweight arm (handpad magnet). So only one USB cable goes from the moving mount to the laptop.
The devices needing 12V power get that from one source again having only one power cable going onto the moving rig.
Setting up NINA and PHD2
You must have ASCOM, NINA and PHD2 on the computer to make an automated setup. All three software packages are free to download. Besides this you need a Plate Solve app. I use ASTAP.
In this paragraph I will focus on the settings needed for this type of setup and with extra focus on the settings when using Alt-Az mounts. For more general introduction to NINA and PHD2 check out the many tutorials available.
Note that for this setup NINA version 1.10 HF3 was used.
ASCOM
Download and install the latest version of the ASCOM Platform.
Download a driver for the mount. For the Panther Mount use Meade LX200 Classic and Autostar #494, #495, and #497.
If needed download drivers for your imaging and guide cameras, filterwheel, camera rotator and focuser.
PHD2 setup
Download and install PHD2.
Open the Connect Equipment window.
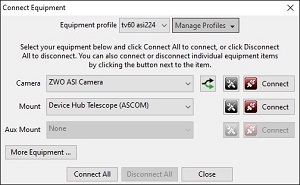
Select your guide camera.
As mount select Device Hub Telescope.
Using the Device Hub allows more software programs to communicate with the mount simultaneously. In this case NINA and PHD2.
To setup the Device Hub click on the settings icon ![]() .
.
This will start the Device Hub program.
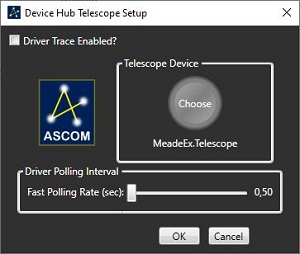
Click Choose to select the Ascom driver.
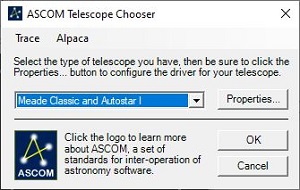
Select the correct Ascom driver. For the Panther Mount use Meade Classic and Autostar 1.
Click Properties to setup.
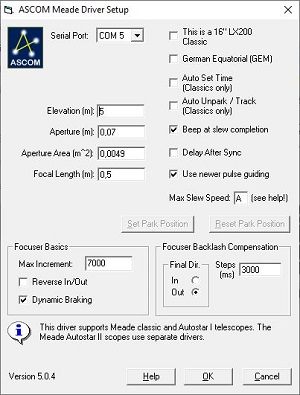
Select the relevant Serial Port.
Note on serial ports: Windows assigns the COM port number. Depending on the USB devices connected to the different USB ports this number can change. I suggest you always inserts the same Equipment into the same USB ports and connect everything before powering up the PC. This will ensure the different devices gets assigned the same way every time. Otherwise this can be cumbersome.
If you have problems finding the correct COM port number check the windows device manager.
Close the windows related to the Device Hub.
Finally in PHD2 you have to enable the Server.
Open the Tools menu and click on Enable Server.
This will allow for NINA to control PHD2.
This completes the setup of PHD2 in relation to the control from NINA. You still need to setup all the guiding parameters in PHD2 to get the correct guiding. If you have not done this before I strongly suggest that you do this before moving on to setting up NINA. There are many settings working together when everything is ready for automation. To know that PHD2 is working correctly together with the mount before moving on makes it easier to identify any problems occurring.
Related to the PHD2 setup I suggest you read my post: Guiding the Panther Alt-Az mount with PHD2
NINA Setup
Here I will take you through the settings needed for complete automation with NINA. After setting up it is necessary to test the system in small steps before running a complete automated session.
We will start with Equipment setup. On the Equipment setup tab we must look at, Camera, Filterwheel, Focuser, Rotator, Telescope & Guider.
Camera setup

Select the driver for your camera and adjust settings as needed.
Press Connect.
When the camera is connected you will get information about the camera and can control cooling etc.
Check that you can control cooling.
Filterwheel setup
(if you don’t use a filter wheel just move on to Focuser)
Select the driver for your filterwheel and adjust settings as needed.
Press Connect.
Try to change filter (watch/listen to know it is moving)
Focuser setup
(if you don’t use an electronic focuser just move on to Rotator)
Select the driver for your focuser and adjust settings as needed.
Press Connect.
Try to move the focuser by pressing the arrows and watch the focuser move.
Rotator setup (this is the camera rotator)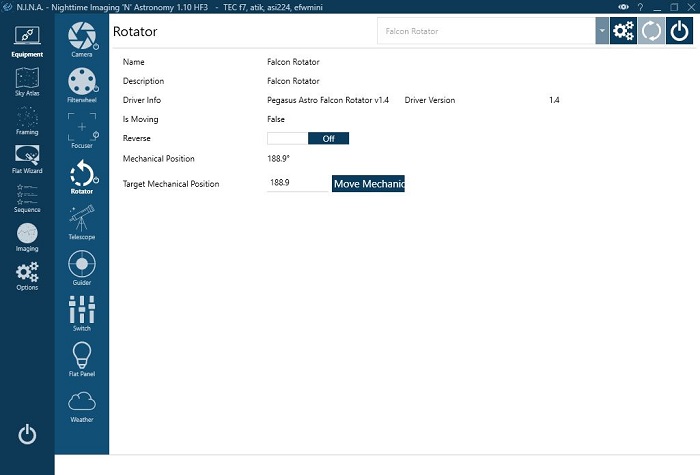
The camera rotator is used to frame the targets to the wished FOV angle and to keep this angle after the automatic rewinding of the telescope rOTAtor.
In this case I have used a Falcon rotator but other brands can be used too.
First you must install the Falcon rotator desktop app that can be downloaded from Pegasus Astro website.
Select the Falcon Rotator driver.
Press Connect.
This will start the Falcon Rotator app but will NOT connect to NINA. You must press Connect once more and then the rotator will be connected.
You can test the Rotator by typing in a target position and press Move Mechanic and watch the movement.
NOTE: To have the Plate solve function working correctly with the Rotator the “Reverse” function must be off. This reverse functionality can also be setup on the Falcon Desktop app so keep an eye on this.
Telescope mount setup
Select the Device Hub in the drop down menu.
The setup of the Device Hub was already done inside PHD2 earlier (see above).
Press Connect
If you are asked to synchronize time and geographical coordinates say No.
When the mount is connected you will see the RA and DEC coordinates displayed. These will match the coordinates on the handpad.
The manual control buttons are not implemented in the Meade Ascom driver and will not work. If needed there are similar buttons on the Device Hub that works.
Guider setup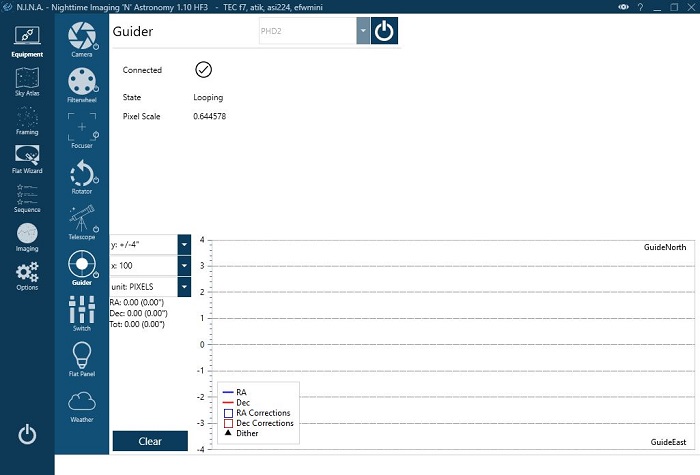
Select PHD2 and press Connect
If PHD2 is not started already the program will start up and connect to guide camera and Device Hub (mount).
When started and ready NINA will show a checkmark next to Connected.
This completes the setting up of the different devises connected to your system.
NINA Options
Next step is to look at the Options setup in NINA.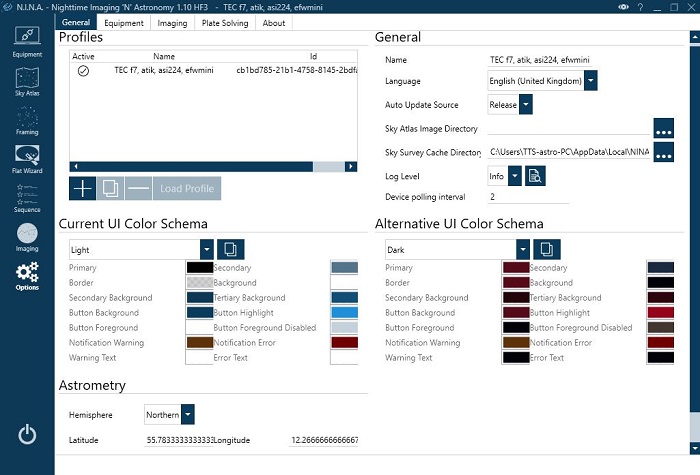
Under the Options Screen you find five Tabs. Here we will look at:
- General
- Equipment
- Imaging
- Plate solving
Again focus will be on the settings related to the automated use with an Alt-Az Mount. There are more settings that you can examine but what we cover here should do for a start.
On the General tab you must create a Profile for the system you are setting up. IMPORTANT: The Profile will be saved and can be loaded next time you start up with all settings ready to go.
Options – Equipment Tab
The camera section is automatic populated with basic camera data when the camera is connected.
In the Telescope section fill in the data as shown in the screenshot. Be sure to have the correct focal length as this will be used for plate solving. Set the settle time after slew to 20 sec to allow the rOTAtor to complete rewinding.
The setup of the Focuser section depends on your focus motor and the optical configuration. I suggest you find another tutorial explaining this.
The Filterwheel section must be setup. Focus offset is used if it is enabled in the focuser section. Auto focus exposure time is something to experiment with. I use 2 secs for LUM and RGB. For H-alpha I have tried with longer exposure time but generally autofocus in HA is difficult.
The Guider section can as a start be setup as shown in the screenshot. Depending on your guide setup some adjustment might be needed.
Options – Imaging Tab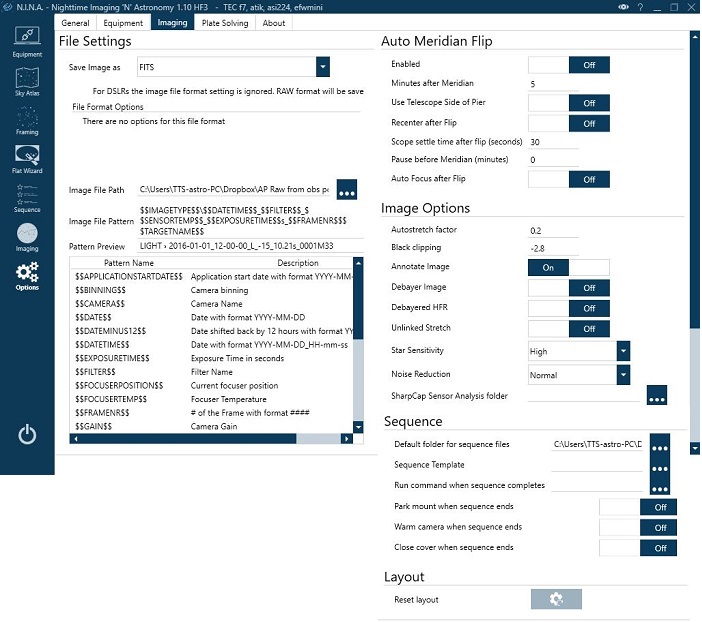
In the left half of this tab you select the file format the images will be saved in and you can setup a file naming pattern allowing to include different image data in the file name.
The Auto Meridan Flip section is very important when you use an Alt-Az mount. The Auto Meridian Flip function must be disabled.
The Image Options section can influence how well the Plate solver works so especially the Star Sensitivity and Noise reduction must be watched. I like to have Annotate Image enabled so the HFR value can be displayed directly on the image.
In the Sequence section you set the folder for saving sequence files and you can decide what happens when the sequence is completed.
Options – Plate Solving Tab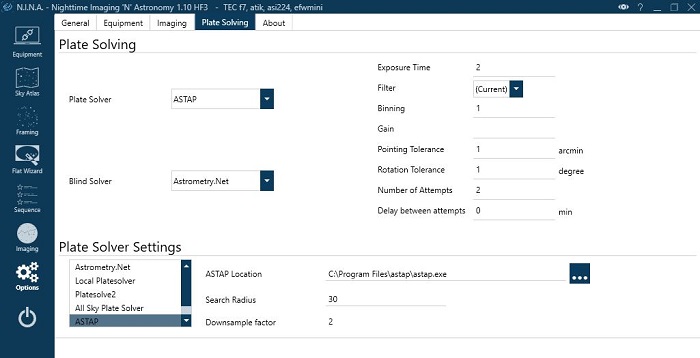
I use ASTAP as the main Plate Solver.
You must download and install ASTAP before setting up in NINA. You will find all the needed information here.
Select ASTAP as Plate Solver.
In the Plate Solver Settings section input the path for the ASTAP .exe file. A search radius of 30 degrees is the default value and works fine. Downsample factor of 2 is also fine.

I use Astrometry.net as blind Solver. You need to register an account (free) at the website to get the API Key to input.
This completes the setup. It might looks overwhelming but you only need to do it once.
Testing the system in the Image Panel
The image panel is where you can control the equipment manually and where the images are displayed. I strongly suggest you test the individual parts of the setup on the Image Panel before starting an automated sequence.
Test Camera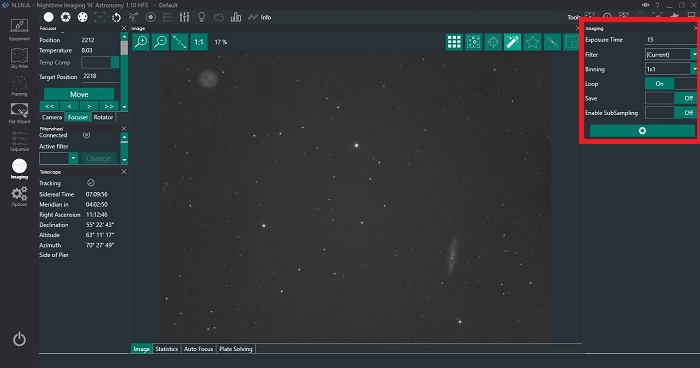
Start the camera looping short exposures and see that the frames look correct.
Test Focuser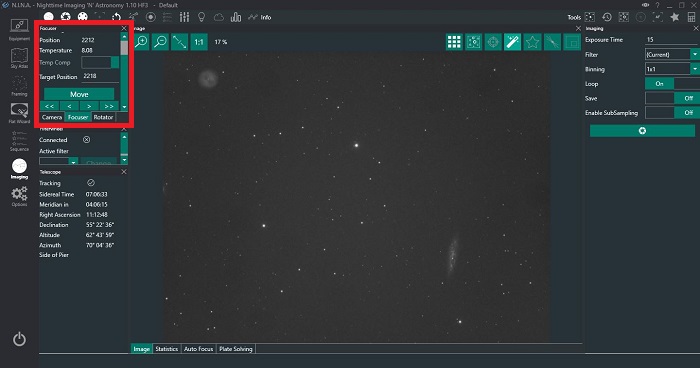
Push the arrows and watch the focus motor move.
Focus the image as good as you can using the arrows.
Test Autofocus
After having achieved a fairly good focus manually (important) try to start autofocus.
You should see the system create a V-Curve and find focus. This will take several minutes going through the steps.
There are several settings to play with to get the best results.
Test Plate solve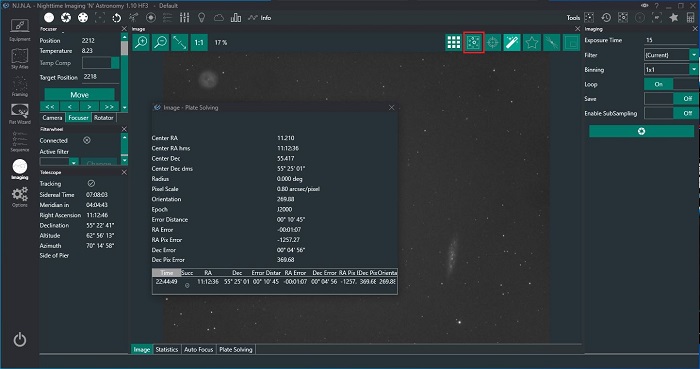
Now the camera is well focused. Take a short – like 5 sec exposure. Press the Plate solve icon and get the result. If you are using a wide field system ASTAP should solve every time in a few seconds. If you work with a small FOV it can be more difficult in parts of the sky with few stars.
Be sure it works fairly consistently before using it as part of a sequence.
Test camera rotator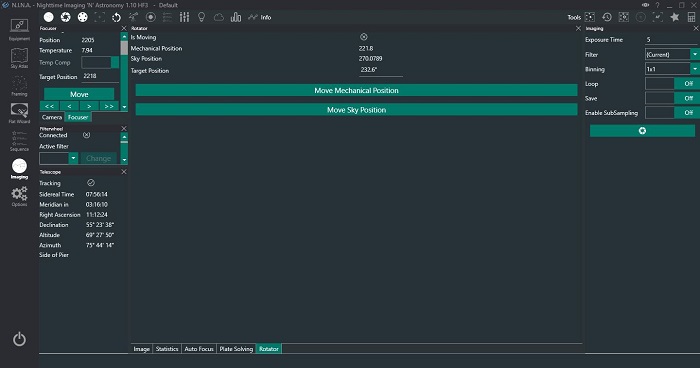
Try typing a target position and watch the camera rotator move to the target position.
Now everything is ready for everyday use.
Setting up and running a sequence
A sequence can be setup either when you are ready with the telescope or you can do it beforehand so everything is ready when the sky clears.
It is possible to use the framing assistant as shown in the beginning of this post or you can can go directly to the Sequence Tab.
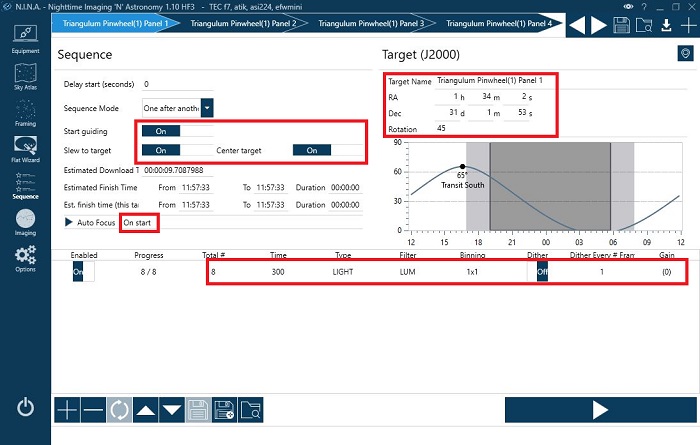
In the sequence tab fill in the following data
Target – Type in a target name/number. RA and DEC are loaded from the catalogue. Input a wished rotation angle (camera rotator angle)
Start Guiding – Switch on to start PHD2 guiding
Slew to target – Switch on to have the mount slew to the target
Center target – Switch on to have NINA precisely center the target based on Plate solving.
Autofocus – under the Autofocus section you can setup when an Autofocus must be made
Finally input details about the sub exposures you want the system to take.
PRESS PLAY
The system will execute the sequence as. While the sequence is running you can change to the image tab to view the images coming in.
Extended exposure time with the telescope rOTAtor using more targets.
When using the TTS-160 telescope rOTAtor you must watch it’s de-rotation time. On most occasion it will de-rotate at least 1 hour. Therefore when you set up the sub exposures keep the combined exposure time under one hour. To have more exposure time create a new target with the same target coordinates and angles. Be sure to enable Slew to target and Center target. Then add the subs for the next hour. Repeat as many time as wished.
When a new target is started the Slew to target command will automatically rewind the telescope rOTAtor and the Center target command will recenter the FOV both in RA-DEC position and rotation angle. So all frames will be aligned identically.
Conclusion
Getting all the it settings right for an automated system takes time but the spent time will come back many times if you like taking many long exposure astrophotos.
Good luck and clear skies.